Showing posts with label Tips And Tricks. Show all posts

Sunday, April 28, 2013


Android Mobile Codes & Tricks


*#*#4636#*#*

This code can be used to get some interesting information about your phone and battery. It shows following 4 menus on screen:

Phone information
Battery information
Battery history
Usage statistics

*#*#7780#*#*

This code can be used for a factory data reset. It'll remove following things:

Google account settings stored in your phone
System and application data and settings
Downloaded applications

It'll NOT remove:

Current system software and bundled applications
SD card files e.g. photos, music files, etc.

PS: Once you give this code, you get a prompt screen asking you to click on "Reset phone" button. So you get a chance to cancel your operation.

*2767*3855#

Think before you give this code. This code is used for factory format. It'll remove all files and settings including the internal memory storage. It'll also reinstall the phone firmware.

PS: Once you give this code, there is no way to cancel the operation unless you remove the battery from the phone. So think twice before giving this code.

*#*#34971539#*#*

This code is used to get information about phone camera. It shows following 4 menus:

Update camera firmware in image (Don't try this option)
Update camera firmware in SD card
Get camera firmware version
Get firmware update count

WARNING: Never use the first option otherwise your phone camera will stop working and you'll need to take your phone to service center to reinstall camera firmware.

*#*#7594#*#*

This one is my favorite one. This code can be used to change the "End Call / Power" button action in your phone. Be default, if you long press the button, it shows a screen asking you to select any option from Silent mode, Airplane mode and Power off.

You can change this action using this code. You can enable direct power off on this button so you don't need to waste your time in selecting the option.

*#*#273283*255*663282*#*#*

This code opens a File copy screen where you can backup your media files e.g. Images, Sound, Video and Voice memo.

*#*#197328640#*#*

This code can be used to enter into Service mode. You can run various tests and change settings in the service mode.

WLAN, GPS and Bluetooth Test Codes:

*#*#232339#*#* OR *#*#526#*#* OR *#*#528#*#* - WLAN test (Use "Menu" button to start various tests)

*#*#232338#*#* - Shows WiFi MAC address

*#*#1472365#*#* - GPS test

*#*#1575#*#* - Another GPS test

*#*#232331#*#* - Bluetooth test

*#*#232337#*# - Shows Bluetooth device address

*#*#8255#*#*

This code can be used to launch GTalk Service Monitor.

Codes to get Firmware version information:

*#*#4986*2650468#*#* - PDA, Phone, H/W, RFCallDate

*#*#1234#*#* - PDA and Phone

*#*#1111#*#* - FTA SW Version

*#*#2222#*#* - FTA HW Version

*#*#44336#*#* - PDA, Phone, CSC, Build Time, Changelist number

Codes to launch various Factory Tests:

*#*#0283#*#* - Packet Loopback

*#*#0*#*#* - LCD test

*#*#0673#*#* OR *#*#0289#*#* - Melody test

*#*#0842#*#* - Device test (Vibration test and BackLight test)

*#*#2663#*#* - Touch screen version

*#*#2664#*#* - Touch screen test

*#*#0588#*#* - Proximity sensor test

*#*#3264#*#* - RAM version

i havent tested all codes, but u can find out and tell me which dont work

Tuesday, February 19, 2013


In Windows XP, use the following steps to reset the Internet Protocol: 
1. Click Start 
2. Click Run 
3. Type cmd 
4. Click Ok 
5. In the Black Command Box Type: netsh int ip reset c:\resetlog.txt 
6. Hit Enter Key 
7. Restart the computer and try to log in and browse the Internet. If the problem persists, continue using these steps. 
8. Click Start 
9. Click Run 
10. Type cmd 
11. Click Ok 
12. In Black Command Box Type: netsh winsock reset 
13. Hit Enter Key 
14. Restart Computer 
Also Try Resetting IE8 to Default Options 
Click Tools Tab 
Click Internet Options at bottom 
Click Advanced Tab on far right 
Click Reset near bottom 
Click Ok and Close Internet Explorer 8 
Restart Internet Explorer 8

Saturday, February 16, 2013


Even though Disk Cleanup is not a very often used tool in Windows, it still does come in handy and I have found that it does a good job of getting rid of some stuff that other cleaners can’t. In Windows 8, you can open Disk Cleanup in a number of ways. In this post, I’ll walk you through the different ways to get to Disk Cleanup.
windows 8 disk cleanup

Disk Cleanup via Administrative Tools

The first way to get to Disk Cleanup is to go to the Control Panel and then open Administrative Tools and click on Disk Cleanup. Pretty straight-forward, but kind of a tedious process.
adminitrative tools
You can read my previous post on how to open the Control Panel in Windows 8 if you’re having trouble doing that.

Disk Cleanup via Search Charm

The easiest way to open Disk Cleanup is to open the Charms bar and then click on Search.  Type in Disk Cleanup and then click on Settings.
free up disk space
Click on Free up disk space by deleting unnecessary files. This will bring up Disk Cleanup.

Disk Cleanup via Run Dialog

Another way to do this is to open a run dialog and type in the direct executable for disk cleanup. Go to the Start Screen, right-click and choose All apps at the bottom. Scroll to the right and then click on Run. Type in Cleanmgr.exe.
cleanmgr exe

Pin to Start Screen

If you really use it a lot, you can right-click on Disk Cleanup in Administrative Tools and choose Pin to Start or Pin to Taskbar.
pin disk cleanup

Show Administrative Tools

Lastly, if you use a lot of the tools under Administrative Tools, you can add them all to the Start Screen and All apps list by going to the Start Screen, opening the Charms bar, clicking on Settings and then clicking on Tiles.
tiles settings
Under Show administrative tools, go ahead and switch the bar to Yes.
show admin tools
Now all the Administrative Tools, including Disk Cleanup, will show up on the Start Screen and on the All apps list.
start screen tools
all apps tools
That’s about it! There are many ways to get to settings and apps in Windows 8, so feel free to customize it to the way you like. Enjoy!
When you're using a pen drive to transfer data between PCs, the common problem is viruses. You might format your pen drive many times because of viruses. Some kind of viruses never get delete by normal formatting. Are you disappointed of the result that you get after formatting your pen drive and still find viruses in it?

Here I'll give you a solution to format your USB pen drive completely.

You can format pen drives using command prompt to remove all the virus files permanently. Most of the times these type of formats delete all the viruses from pen drive.


How to Format USB Pen Drives Using Command Prompt to Delete Viruses Permanently

So let's see how to format your pen drive using command prompt.


Insert pen drive into your PC

Find the drive letter of the pen drive

Now click on Start ---> Run

In run box, type cmd and hit Enter

Now command prompt will appear, in this window type format "your pen drive letter:"
For example type : format g:


Hit Enter twice

Wait for sometime until command prompt verify the file system.


How to Format USB Pen Drives Using Command Prompt to Delete Viruses Permanently


Now command prompt will ask you to enter a drive name.

After that type the drive name and then hit Enter again.


How to Format USB Pen Drives Using Command Prompt to Delete Viruses Permanently


That's all, you have done !!!

Use a USB Flash Drive for RAM Memory:


We use USB to transfer the data’s. The USB can be used asRAM. Let’s start with windows vista; those who use pc’s can use their USBdrives to increase the performances of their computer. This is called ReadyBoost. Ready Boost deal with free spacethat is on your USB drives, such as RAM. When we increase RAM that’s equal to more speed. Ready Boost comprise on all free versions ofwindows vista and windows 7. It’s easy to setup the positions and in few minutes it can be finished.

1. Insert the USB drive in your computer.
2. Go to "My Computer" then right-click on the USB drive. 
3. Go to "Properties"
4. Next, click on the "ReadyBoost" tab.
5. Choose the option that says "Use this device".
6. Under "Space to reserve for system speed", select the amount of memory that you wish to use for your USB flash drive. The amount of memory that Windows recommends is usually the best setting and should not be exceeded.
7. Click on "OK" to save your settings and exit.
8. Restart your computer for the changes to take affect.


Use a USB Flash Drive for RAM Memory:


We use USB to transfer the data’s. The USB can be used asRAM. Let’s start with windows vista; those who use pc’s can use their USBdrives to increase the performances of their computer. This is called ReadyBoost. Ready Boost deal with free spacethat is on your USB drives, such as RAM. When we increase RAM that’s equal to more speed. Ready Boost comprise on all free versions ofwindows vista and windows 7. It’s easy to setup the positions and in few minutes it can be finished.

1. Insert the USB drive in your computer.
2. Go to "My Computer" then right-click on the USB drive. 
3. Go to "Properties"
4. Next, click on the "ReadyBoost" tab.
5. Choose the option that says "Use this device".
6. Under "Space to reserve for system speed", select the amount of memory that you wish to use for your USB flash drive. The amount of memory that Windows recommends is usually the best setting and should not be exceeded.
7. Click on "OK" to save your settings and exit.
8. Restart your computer for the changes to take affect.

Today Computer World tutorial is about how to hide a local drive without any 3rd party software. There are lots of free and payable software's available to hide local drive, but I'm not gonna talk about hide a local drive using a software. In this tutorial I'll show you an easiest way to hide local drive without using software. This will save your both money and time.

There are 3 methods available to hide a local drive without using any software

1. Hide a drive through gpedit
2. Hide a drive through regedit
3. Hide a drive using command prompt


Today we are covering command prompt way of doing it. So lets see how to do.


How to Hide any Local Drive using Command prompt

How to Hide a Local Drive using command prompt?

1. Click on Start - Run

2. In Run box type cmd and hit Enter. Now Command Prompt window will appear.

3. In command prompt, type diskpart and hit Enter.

4. Then type list volume and hit Enter.

Now it will display the list of all your computer drives details.


5. Then type the Drive Letter which you want to hide.
If you want to hide volume E, type select volume E and hit Enter.

Now follow mentioned massage will appear to you.
Volume 4 is the selected volume


How to Hide any Local Drive using Command prompt


6. After that, type remove letter E and hit an Enter. 

That's all, you have done. Now restart your computer once. When you start your PC again, you want be able to see the
 particular drive in My Computer.


How to get back Hidden Drive again in My Computer.

Do the procedure which i have mentioned in step 1,2,3,4 and 5 again.

Click Start --> Run --> cmd -->

Then type diskpart - list volume - select volume E

After that type assign letter E and hit Enter.

That's all !! You have got back the hidden local drive. Once again restart your PC, now you will be able to see hidden local drive in My Computer.

Note: Your PC doesn't lost any data by doing this trick .

Tuesday, January 29, 2013

Open Your IE9 Browser
 
How to Disable JavaScript In IE9
 
Internet Explorer 9 users that wish to disable JavaScript in their browser, whether for security or development purposes, can do so in just a few easy steps. This tutorial shows you how it's done.
First, open your IE9 browser.


Gear Menu

How to Disable JavaScript In IE9
Click on IE9's Gear button, located in the upper right hand corner of your browser window. When the drop-down menu appears, click on Internet options.

Internet Options

How to Disable JavaScript In IE9
IE9's Internet Options dialog should now be displayed, overlaying your browser window. Click on the Security tab.

Custom Level

How to Disable JavaScript In IE9

IE9's Security options should now be displayed. Click on the Custom level... button, as shown in the example above.

Internet Zone
 
How to Disable JavaScript In IE9
IE9's Internet Zone settings should now be displayed. Scroll down until you locate the Scripting section
 
Disable JavaScript
 
How to Disable JavaScript In IE9
To disable JavaScript and other active scripting components in IE9, first locate the Active scripting subheading. Next, click on the accompanying Disable radio button. If you would rather be prompted each time a website attempts to launch any scripting code, select the Prompt radio button.
 

Thursday, December 13, 2012

Keyboard Shorcuts (Microsoft Windows)
1. CTRL+C (Copy)

2. CTRL+X (Cut)
...... 3. CTRL+V (Paste)
4. CTRL+Z (Undo)
5. DELETE (Delete)
6. SHIFT+DELETE (Delete the selected item permanently without placing the item in the Recycle Bin)
7. CTRL while dragging an item (Copy the selected item)
8. CTRL+SHIFT while dragging an item (Create a shortcut to the selected item)
9. F2 key (Rename the selected item)
10. CTRL+RIGHT ARROW (Move the insertion point to the beginning of the next word)
11. CTRL+LEFT ARROW (Move the insertion point to the beginning of the previous word)
12. CTRL+DOWN ARROW (Move the insertion point to the beginning of the next paragraph)
13. CTRL+UP ARROW (Move the insertion point to the beginning of the previous paragraph)
14. CTRL+SHIFT with any of the arrow keys (Highlight a block of text)
SHIFT with any of the arrow keys (Select more than one item in a window or on the desktop, or select text in a document)
15. CTRL+A (Select all)
16. F3 key (Search for a file or a folder)
17. ALT+ENTER (View the properties for the selected item)
18. ALT+F4 (Close the active item, or quit the active program)
19. ALT+ENTER (Display the properties of the selected object)
20. ALT+SPACEBAR (Open the shortcut menu for the active window)
21. CTRL+F4 (Close the active document in programs that enable you to have multiple documents opensimultaneou sly)
22. ALT+TAB (Switch between the open items)
23. ALT+ESC (Cycle through items in the order that they had been opened)
24. F6 key (Cycle through the screen elements in a window or on the desktop)
25. F4 key (Display the Address bar list in My Computer or Windows Explorer)
26. SHIFT+F10 (Display the shortcut menu for the selected item)
27. ALT+SPACEBAR (Display the System menu for the active window)
28. CTRL+ESC (Display the Start menu)
29. ALT+Underlined letter in a menu name (Display the corresponding menu) Underlined letter in a command name on an open menu (Perform the corresponding command)
30. F10 key (Activate the menu bar in the active program)
31. RIGHT ARROW (Open the next menu to the right, or open a submenu)
32. LEFT ARROW (Open the next menu to the left, or close a submenu)
33. F5 key (Update the active window)
34. BACKSPACE (View the folder onelevel up in My Computer or Windows Explorer)
35. ESC (Cancel the current task)
36. SHIFT when you insert a CD-ROMinto the CD-ROM drive (Prevent the CD-ROM from automatically playing)
Dialog Box - Keyboard Shortcuts
1. CTRL+TAB (Move forward through the tabs)
2. CTRL+SHIFT+TAB (Move backward through the tabs)
3. TAB (Move forward through the options)
4. SHIFT+TAB (Move backward through the options)
5. ALT+Underlined letter (Perform the corresponding command or select the corresponding option)
6. ENTER (Perform the command for the active option or button)
7. SPACEBAR (Select or clear the check box if the active option is a check box)
8. Arrow keys (Select a button if the active option is a group of option buttons)
9. F1 key (Display Help)
10. F4 key (Display the items in the active list)
11. BACKSPACE (Open a folder one level up if a folder is selected in the Save As or Open dialog box)

Microsoft Natural Keyboard Shortcuts
1. Windows Logo (Display or hide the Start menu)
2. Windows Logo+BREAK (Display the System Properties dialog box)
3. Windows Logo+D (Display the desktop)
4. Windows Logo+M (Minimize all of the windows)
5. Windows Logo+SHIFT+M (Restorethe minimized windows)
6. Windows Logo+E (Open My Computer)
7. Windows Logo+F (Search for a file or a folder)
8. CTRL+Windows Logo+F (Search for computers)
9. Windows Logo+F1 (Display Windows Help)
10. Windows Logo+ L (Lock the keyboard)
11. Windows Logo+R (Open the Run dialog box)
12. Windows Logo+U (Open Utility Manager)
13. Accessibility Keyboard Shortcuts
14. Right SHIFT for eight seconds (Switch FilterKeys either on or off)
15. Left ALT+left SHIFT+PRINT SCREEN (Switch High Contrast either on or off)
16. Left ALT+left SHIFT+NUM LOCK (Switch the MouseKeys either on or off)
17. SHIFT five times (Switch the StickyKeys either on or off)
18. NUM LOCK for five seconds (Switch the ToggleKeys either on or off)
19. Windows Logo +U (Open Utility Manager)
20. Windows Explorer Keyboard Shortcuts
21. END (Display the bottom of the active window)
22. HOME (Display the top of the active window)
23. NUM LOCK+Asterisk sign (*) (Display all of the subfolders that are under the selected folder)
24. NUM LOCK+Plus sign (+) (Display the contents of the selected folder)
25. NUM LOCK+Minus sign (-) (Collapse the selected folder)
26. LEFT ARROW (Collapse the current selection if it is expanded, or select the parent folder)
27. RIGHT ARROW (Display the current selection if it is collapsed, or select the first subfolder)
Shortcut Keys for Character Map
After you double-click a character on the grid of characters, you can move through the grid by using the keyboard shortcuts:
1. RIGHT ARROW (Move to the rightor to the beginning of the next line)
2. LEFT ARROW (Move to the left orto the end of the previous line)
3. UP ARROW (Move up one row)
4. DOWN ARROW (Move down one row)
5. PAGE UP (Move up one screen at a time)
6. PAGE DOWN (Move down one screen at a time)
7. HOME (Move to the beginning of the line)
8. END (Move to the end of the line)
9. CTRL+HOME (Move to the first character)
10. CTRL+END (Move to the last character)
11. SPACEBAR (Switch between Enlarged and Normal mode when a character is selected)
Microsoft Management Console (MMC)
Main Window Keyboard Shortcuts
1. CTRL+O (Open a saved console)
2. CTRL+N (Open a new console)
3. CTRL+S (Save the open console)
4. CTRL+M (Add or remove a console item)
5. CTRL+W (Open a new window)
6. F5 key (Update the content of all console windows)
7. ALT+SPACEBAR (Display the MMC window menu)
8. ALT+F4 (Close the console)
9. ALT+A (Display the Action menu)
10. ALT+V (Display the View menu)
11. ALT+F (Display the File menu)
12. ALT+O (Display the Favorites menu)

MMC Console Window Keyboard Shortcuts
1. CTRL+P (Print the current page or active pane)
2. ALT+Minus sign (-) (Display the window menu for the active console window)
3. SHIFT+F10 (Display the Action shortcut menu for the selected item)
4. F1 key (Open the Help topic, if any, for the selected item)
5. F5 key (Update the content of all console windows)
6. CTRL+F10 (Maximize the active console window)
7. CTRL+F5 (Restore the active console window)
8. ALT+ENTER (Display the Properties dialog box, if any, for theselected item)
9. F2 key (Rename the selected item)
10. CTRL+F4 (Close the active console window. When a console has only one console window, this shortcut closes the console)
Remote Desktop Connection Navigation
1. CTRL+ALT+END (Open the Microsoft Windows NT Security dialog box)
2. ALT+PAGE UP (Switch between programs from left to right)
3. ALT+PAGE DOWN (Switch between programs from right to left)
4. ALT+INSERT (Cycle through the programs in most recently used order)
5. ALT+HOME (Display the Start menu)
6. CTRL+ALT+BREAK (Switch the client computer between a window and a full screen)
7. ALT+DELETE (Display the Windows menu)
8. CTRL+ALT+Minus sign (-) (Place a snapshot of the active window in the client on the Terminal server clipboard and provide the same functionality as pressing PRINT SCREEN on a local computer.)
9. CTRL+ALT+Plus sign (+) (Place asnapshot of the entire client window area on the Terminal server clipboardand provide the same functionality aspressing ALT+PRINT SCREEN on a local computer.)

Microsoft Internet Explorer Keyboard Shortcuts
1. CTRL+B (Open the Organize Favorites dialog box)
2. CTRL+E (Open the Search bar)
3. CTRL+F (Start the Find utility)
4. CTRL+H (Open the History bar)
5. CTRL+I (Open the Favorites bar)
6. CTRL+L (Open the Open dialog box)
7. CTRL+N (Start another instance of the browser with the same Web address)
8. CTRL+O (Open the Open dialog box,the same as CTRL+L)
9. CTRL+P (Open the Print dialog box)
10. CTRL+R (Update the current Web )

Wednesday, December 12, 2012


Open your registry and find the key below.
Create a new DWORD value, or modify the existing value called 'NoRecentDocsHistory' set the value to equal '1' to enable the restriction.
Exit your registry, you may need to restart for the changes to take effect.
Registry Editor Example
|NameTypeData|
|(Default)REG_SZ(value not set)|
|NoRecentDocsHistoryREG_DWORD0x00000001 (1)|
-
|HKEY_CURRENT_USER\Software\Microsoft\Windows\CurrentVersion\...|
-
Registry Settings
User Key: [HKEY_CURRENT_USER\Software\Microsoft\Windows\CurrentVersion\Policies\
Explorer]
System Key: [HKEY_LOCAL_MACHINE\Software\Microsoft\Windows\CurrentVersion\Policies\
Explorer]
Value Name: NoRecentDocsHistory
Data Type: REG_DWORD (DWORD Value)
Value Data: (0 = disable restriction, 1 = enable restriction)

Sunday, July 29, 2012


Few days ago we have posted an article about installing Turbo C++ on 32 bit Windows 7. Now we are providing step-by-step procedure how to install Turbo C++ on 64 bit Windows 7.
1. Install the software DOSBox ver 0.73 : download here
2. Create a folder,for example „Turbo“ (c:\Turbo\)
3. Download and extract TC into the Turbo folder (c:\Turbo\): download here
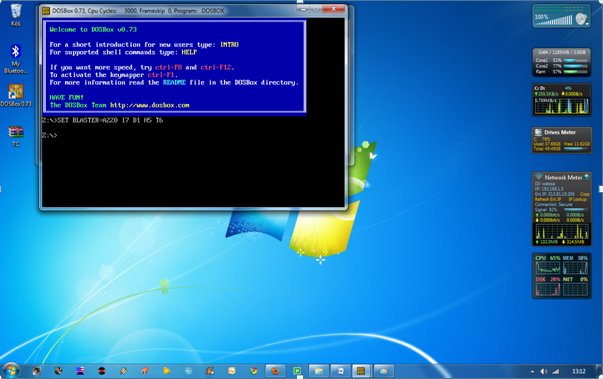
4. Run the DOSBox 0.73 from the icon located on the desktop:
step 1 How to install Turbo C++ on Windows 7 64bit
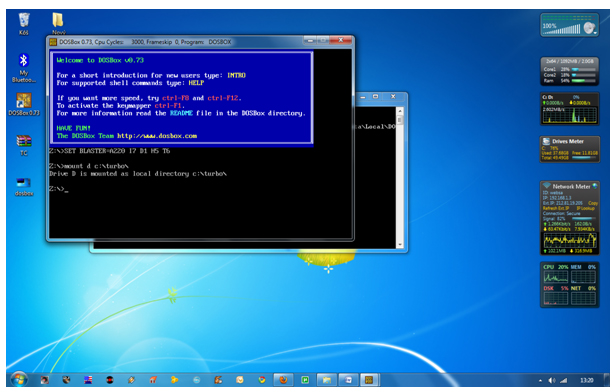
5. Type the following commands at the command prompt [Z]: mount d c:\Turbo\ [The folder TC is present inside the folder Turbo]
Now you should get a message which says: Drive D is mounted as a local directory c:\Turbo\
step 2 How to install Turbo C++ on Windows 7 64bit
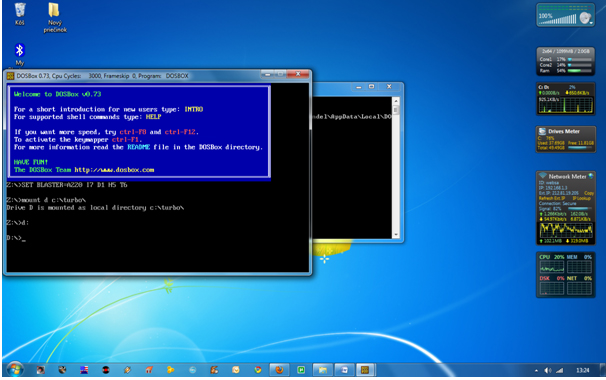
6. Type d: to shift to d:
step 3 How to install Turbo C++ on Windows 7 64bit
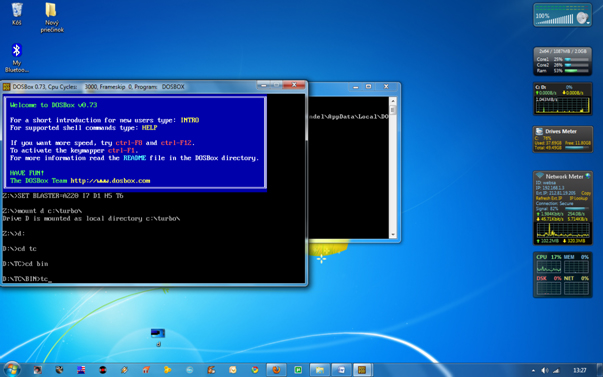
7. Next follow the commands below:
cd tc
cd bin
tc or tc.exe [This starts you the Turbo C++ 3.0]
step 4 How to install Turbo C++ on Windows 7 64bit
8. In the Turbo C++ goto Options>Directories> Change the source of TC to the source directory [D] ( i.e. virtual D: refers to original c:\Turbo\ . So make the path change to something like D:\TC\include and D:\TC\lib respectively )

How to start TurboC++ in the DOSBox automatically:

You can save yourself some time by having DOSBox automatically mount your folders and start TurboC++:
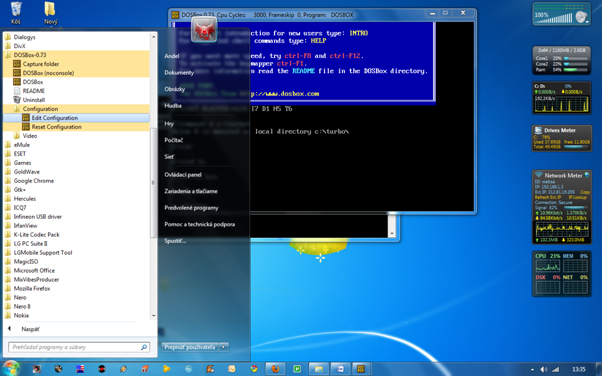
For DOSBox versions older then 0.73 browse into program installation folder and open the dosbox.conf file in any text editor. For version 0.73 go to Start Menu and click on “Configuration” and then “Edit Configuration“. Then scroll down to the very end, and add the lines which you want to automatically execute when DOSBox starts.
Automatically mount and start Turbo C++3.0 in DOSBox ver 0.73:
step 5 How to install Turbo C++ on Windows 7 64bit
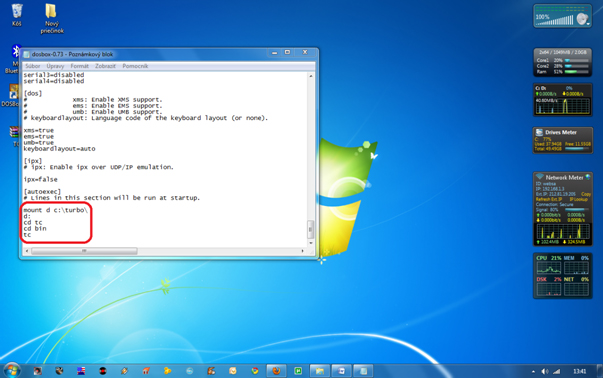
Scroll down to the very end, and add the lines:
step 6 How to install Turbo C++ on Windows 7 64bit
Those commands will be executed automatically when DOSBox starts!
Please note:
Full screen: Alt and Enter
When you exit from the DosBox [precisely when u unmount the virtual drive where Turbo C++ 3.0 has been mounted] all the files you have saved or made changes in Turbo C++ 3.0 will be copied into the source directory(The directory which contains TC folder)
Don’t use shortcut keys to perform operations in TC because they might be a shortcut key for DOSBOX also . Eg : Ctrl+F9 will exit DOSBOX rather running the code .
VIDEO tutorial (there is another setup – original path to Turbo C++ is h:\tc\ and drive H is mounted as drive C:)